

Purpose & Scope
Section 22.42.00 covers commercial plumbing fixtures and the assemblies that allow those fixtures to operate safely, cleanly, and reliably in service.In practice, that scope extends well beyond setting bowls and sinks. It includes rough-in coordination, carriers and floor flanges, shutoff locations, traps, flush valves, vacuum breakers, trap primers, point-of-use tempering, accessibility compliance, sensor controls, and final performance testing.
The FTQ360 checklist applies the familiar three-phase control pattern: Preparatory, Initial, and Follow-Up.
That structure lets the team verify requirements before close-in, validate the first installation, and keep the work consistent through turnover.
What the Checklist Covers
This checklist follows fixture work from submittal review through final acceptance. It starts with manufacturer, model, flow rate, trim, carrier, controls, accessibility configuration, and certification review.
From there, it moves into rough-in layout, backing, access panels, electrical provisions for sensor-operated equipment, and receiving inspection for damaged or nonconforming fixtures.
Once installation begins, the checklist tracks first-install verification for water closets, urinals, lavatories, sinks, carriers, traps, and specialty devices before the crew repeats the work at scale.
From there, the checklist stays focused on the issues that usually create rework. It records measured rough-in dimensions by room and fixture tag, confirms that carriers and anchors stay aligned and fully supported, verifies accessible shutoff locations, and checks that backflow protection, vacuum breakers, trap primers, and tempering devices are installed where required.
It also captures flow and temperature verification, sensor cycling, finish protection, leak testing, flush and drain performance, ADA measurements, startup logs, and the final fixture schedule.
That keeps closeout tied to a clean, auditable QAQC record rather than scattered punch notes.
Common Failure Modes & Risk Prevention
Commercial plumbing fixture work often looks straightforward until coordination breaks down. A rough-in set just slightly out of place can turn into an accessibility failure, a carrier conflict, or a fixture that never sits correctly against the finished wall.
The best defense is disciplined first-article verification: check the first water closet, urinal, lavatory, or sink against the approved layout, capture measured offsets, and stop the work before concealed conditions repeat the same mistake across an entire restroom group.
Support failures create a different kind of problem. Loose carriers, weak backing, or poorly anchored floor flanges can lead to rocking fixtures, broken seals, cracked finishes, callbacks, and safety concerns.
Leaks at bowls, traps, and stops usually trace back to uneven tightening, damaged seals, cross-threaded connections, or strained alignment.
Cross-connection risk follows when vacuum breakers or backflow devices are omitted, installed backwards, or made inaccessible behind finishes.
Temperature and flow noncompliance shows up when the wrong trim is procured, sensor settings are never verified, or ASSE-listed tempering devices are missing at the point of use.
Even when the piping performs, visible finish damage at china, stainless, trim, or sealant lines can still turn into rejection at turnover.
The checklist is designed to catch those failures at the point where they are easiest to correct.
Checklist Preview
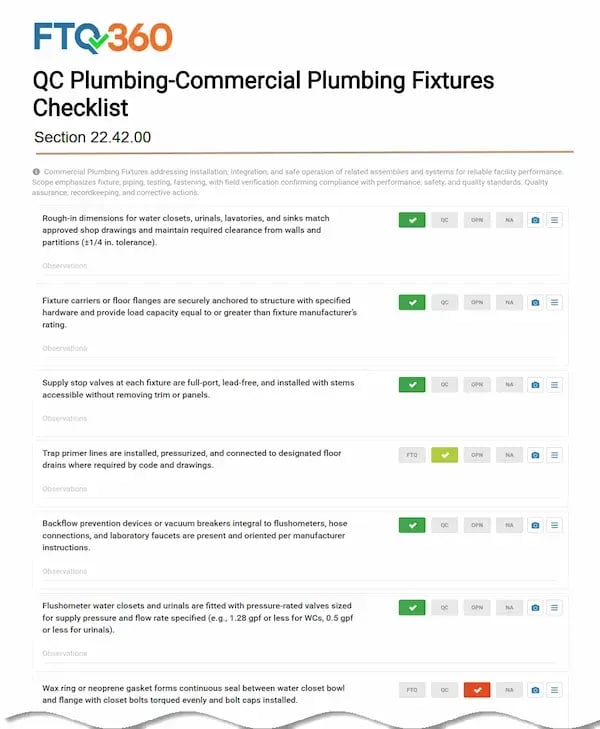
Click to Download Full Checklist

Preparatory Phase
This phase happens before installation starts. The focus is to make sure the crew is working from approved information and that the field conditions are ready to support a compliant installation.
Review approved fixture submittals for manufacturer, model, flow rate, trim, carriers, controls, accessibility configuration, and required labels. Keep that approved reference tied to the inspection record.
Before walls are closed or finishes begin, verify rough-in layout, wall backing, carriers, floor flanges, shutoff locations, trap primer points, access panel locations, and electrical provisions for sensor-operated fixtures or disposers.
At the same time, inspect delivered fixtures and trim for cracks, crazing, blisters, glazing defects, dents, scratches, or shipping damage so nonconforming units never enter the installation sequence.
This is also the point to confirm the criteria that will drive the rest of the work. Accessibility dimensions, clearances, control reach ranges, air gaps, backflow protection, and service access must be understood before the first fixture is set.
Where the design calls for tempering, the preparatory review should clearly identify ASSE 1070 point-of-use mixing locations that limit tempered water to 110 F and any shower control requirements that cap outlet temperature at 120 F.
Supporting standards and labels should already be in hand as well. That includes applicable ASME A112 fixture standards, ICC A117.1 accessibility requirements, ASSE listings for controls and tempering devices, UL 1951 where sensor accessories apply, and EPA WaterSense labeling where specified.
Initial Phase
The initial phase proves that the first installation is correct before repetition hides the problem in multiple rooms.
The first installed water closet, urinal, lavatory, or sink should be checked against the approved dimensions and room layout, with measured offsets and tagged photos recorded before production continues.
The first carrier or floor flange should be verified for anchorage, alignment, elevation, and load path before it is concealed behind walls or finishes.
The first supply stop, trap, escutcheon, and vacuum breaker or backflow assembly should also be inspected for accessibility, orientation, and finish quality so the standard is set early rather than corrected late.
This is the right time to validate controls and accessibility in real field conditions.
The first sensor-operated fixture, soap dispenser, flush valve, or disposer connection should be energized and cycle-tested through at least 10 operations without fault before similar devices are installed throughout the area.
The first accessible fixture arrangement should then be measured for rim height, knee clearance, flush control height, and reach compliance.
Once those first installations are proven and documented, the team has a reliable baseline for the rest of the work.
Follow-Up Phase
The follow-up phase keeps the installation within limits as production moves room by room. Maintain rough-in dimensions for water closets, urinals, lavatories, and sinks to the approved layout, and verify those dimensions with measured field photos tied to room and fixture tags.
Keep carriers, backing, floor flanges, and anchors tight, level, and fully supported. Do not allow concealment until anchorage and alignment have been signed off.
Supply stops should be lead-free and accessible, metallic traps should be aligned without strain or cross-threading, and no fixture should end up double-trapped.
This phase is also where performance compliance becomes visible. Flush valves, vacuum breakers, backflow devices, and trap primers need to be installed where required, in the correct orientation, and left accessible for service.
Flow and temperature settings need to match the specified fixture type rather than assumptions in the field.
That includes public lavatory faucets limited to 0.5 gpm at 60 psi where specified, private lavatory faucets at 1.5 gpm maximum and 0.8 gpm minimum where specified, metering faucets at 0.25 gallon per cycle where specified, water closets at 1.28 gpf maximum, and urinals at 0.5 gpf maximum.
It also includes lavatory point-of-use tempering at 110 F maximum and shower tempering at 120 F maximum.
Throughout production, finishes should remain protected, exposed ADA covers and insulation should be installed without blocking service access, and any special fixture option should follow the manufacturer’s setup and maintenance requirements exactly.
That includes no-water urinals, sensor-based assemblies, and other specialty fixtures.
Completion — Final Acceptance & Closeout
Closeout is where fixture work either becomes a smooth handover or a last-minute scramble.
Every installed fixture should receive a functional flow, drain, and leak test, with results tied back to the room and fixture tag.
Water closets and urinals should flush fully, lavatories and sinks should drain cleanly, and the system should operate without leakage or objectionable water hammer.
Final mounting heights, accessibility clearances, flush control locations, and operating features at accessible fixtures should all be verified and photographed before turnover.
The final review should also confirm the quality of the visible installation. Sealant joints should be continuous, trim should be complete, escutcheons should be tight to finished surfaces, caps and covers should be in place, and exposed chrome or stainless finishes should be clean and unmarred.
Sensor-operated fixtures, flush valves, soap dispensers, and disposers should be fully commissioned and handed over with startup records, battery information where applicable, disconnect identification, and operating instructions.
The closeout package should include the final fixture schedule with manufacturer, model, flow rate, label or certification data, punch closure status, and any special maintenance requirements.
Unresolved leaks, accessibility failures, or cross-connection issues should stop turnover until they are corrected.

References and Other Specification Systems
References
- AIA MasterSpec — MasterSpec specification resource
- Deltek Specpoint — AIA MasterSpec content platform
- ASME A112.18.1 / CSA B125.1 — Plumbing Supply Fittings
- ASME A112.19.2 / CSA B45.1 — Ceramic Plumbing Fixtures
- ASME A112.19.3 / CSA B45.4 — Stainless Steel Plumbing Fixtures
- ASME A112.6.1M — Floor-Affixed Supports for Off-the-Floor Plumbing Fixtures
- ASSE Product Standards — ASSE 1010, 1016, 1037, 1069, 1070 and 1071
- ICC A117.1 — Accessible and Usable Buildings and Facilities
- EPA WaterSense Product Search — labeled toilets, faucets, showerheads and urinals
- EPA WaterSense Products
- UL 1951 — Electric Plumbing Accessories
Other Specification Systems
- UFGS 22 00 00 — Plumbing, General Purpose
- UFGS 22 42 00.00 40 — Commercial Plumbing Fixtures
- VA Master Specification 22 40 00 — Plumbing Fixtures
- VA Master Specifications — Technical Information Library
- NMS Table of Contents — National Master Specification
- RIB SpecLink — Construction Specification Software
UFGS 22 00 00 Plumbing, General Purpose serves as the current crosswalk basis for fixture-related provisions. UFGS 22 42 00.00 40 is also available as a historical or redundant fixture-related section reference.
VA Master, NMS, and RIB SpecLink plumbing fixture equivalents should be confirmed against the active project master before issuing a formal cross-reference, since commercial plumbing fixture requirements are often distributed across multiple related fixture and accessory sections.
FTQ360 Inspection & QAQC Platform
FTQ360 gives field teams a practical way to manage this work in real time.
Inspectors can capture photos, measurements, tagged room records, and startup checks from tablets or phones in the field, whether they are online or offline.
Required fields, hold points, and conditional logic help prevent skipped checks on supports, controls, tempering, or final accessibility verification.
Time-stamped records also make it easier to tie punch items, corrective actions, and turnover documentation back to the exact fixture location.
How to Use the Free Template (quick start)
If you want to start with the FTQ360 version, open Checklist Setup → Library, search for 22.42.00, and clone the checklist into your project.
From there, tailor the checkpoints to match your contract documents, fixture schedule, and closeout requirements.
Teams that still need paper in selected areas can print a PDF version for field use and later attach photos and results back into FTQ360.
The in-app workflow is what enforces required fields, hold points, and cleaner QAQC records.
MasterSpec® and MasterFormat® are registered trademarks. This blog references MasterSpec section numbers and titles for clarity only and does not reproduce proprietary content. Copyright.