

Purpose & Scope
Section 22.11.13 covers facility water distribution piping outside the building, including the piping, valves, specialties, appurtenances, and related controls needed to connect the site system back to the utility main and forward to the building water system.
Depending on the project, that scope can include domestic water service, fire-service mains, or a combined water and fire-service arrangement. The QAQC challenge is not just getting pipe in the ground.
It is coordinating utility requirements, choosing the approved material and joining pathway, controlling burial and restraint conditions, and proving the system is clean, pressure-tight, accessible, and ready for turnover.
The FTQ360 checklist for this section is built around that full workflow. It starts with utility coordination, submittals, and storage controls, then moves through first-installation verification, buried-piping inspections, valve and specialty installation, hydrostatic testing, flushing, disinfection, and closeout documentation.
The result is a field record that shows not only what was installed, but whether it was installed in the right sequence and accepted before concealment.
What the Checklist Covers
This checklist follows the water-distribution work from preconstruction planning through final acceptance. Early checkpoints focus on approved product data, manufacturer instructions, coordination drawings, utility-company requirements, shop drawings for vault assemblies, and handling controls that keep valves, fittings, and pipe protected before installation.
From there, the checklist shifts to first-run verification: material type, size range, pressure class, joining method, tap or service-connection method, cover depth, restraint details, valve-box or indicator-post setup, and support conditions for aboveground or vault piping.
As production continues, the checklist tracks the items that usually decide whether the work passes cleanly or becomes a rework problem later.
That includes joint quality, pipe transitions, burial depth, restraint at changes in direction, dielectric protection, corrosion controls, valve orientation, meter and detector-check arrangements, backflow-preventer placement, hanger spacing, and contamination control inside the piping.
Closeout then moves into hydrostatic testing, leakage correction, flushing, disinfection, sampling, warning tape, plastic-piping identification where required, and turnover of O&M data and field-quality-control reports.
Common Failure Modes & Risk Prevention
This section has a familiar pattern of field failures, and most of them begin long before final testing. One common problem is installing the wrong pipe material, pressure class, or joining system after approved submittals were already established.
That usually happens when materials are mixed in the yard or crews substitute from available stock, and it creates both acceptance risk and long-term reliability risk. Preventing that starts with receiving inspections, visible marking checks, and first-installation hold points before production work expands.
Another recurring issue is inadequate burial cover or missing restraint at bends, tees, plugs, valves, and hydrant branches. When excavation gets ahead of control points, crews can end up backfilling runs that have the wrong depth or no reliable restraint path.
The consequence is not just a punch-list item. It can mean movement under pressure, freeze exposure, settlement, or excavation after the line should already be complete.
The checklist reduces that risk by tying pre-cover acceptance to burial verification and restraint inspection before the trench disappears.
Valve and specialty installation errors are just as disruptive. A gate valve set without proper access, a curb valve installed in the wrong position, a backflow assembly placed where flooding can occur, or a meter arrangement that does not match utility instructions can all turn a technically complete install into a non-operable one.
Add contamination from missing end caps or poor storage, and even a line that passes visual inspection may still fail flushing or bacteriological acceptance.
That is why this checklist treats utility coordination, storage protection, testing, and disinfection as linked controls rather than separate closeout tasks.
Checklist Preview
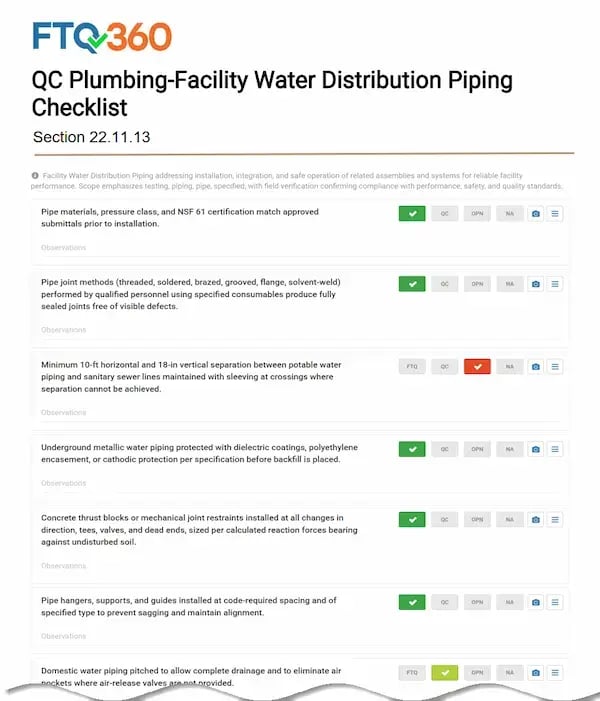
Click to Download Full Checklist

Preparatory Phase
This phase happens before crews begin trenching, laying pipe, or making taps. Start by confirming that approved product data, manufacturer installation instructions, and any required shop drawings for vault assemblies are in the field and organized for use.
Coordination drawings should already show routing, elevations, valve and specialty locations, meter arrangements, and the relationship of this work to nearby utilities and other services.
Because this section connects directly to utility infrastructure, the preparatory review also needs to confirm the approved tap location, connection method, utility responsibilities, and any interruption plan for existing service.
Material control matters early. Inspect pipe, fittings, valves, hydrants, specialties, and accessories before installation to verify standards, pressure class, required markings, potable-water compliance where applicable, and condition on arrival.
Storage and handling procedures should prevent dirt, moisture, sunlight damage, damaged ends, and improper lifting practices.
This is also the point to align the team on the governing installation path for the selected material system, whether that means ductile iron, copper, PE, PVC, fiberglass, or a combination allowed by the project.
Initial Phase
The initial phase proves that the first installation is correct before crews repeat it across the site. Verify the first delivered pipe bundle and fitting group against the approved material option, size range, and joining method.
Then inspect the first tap or service connection and confirm it uses the correct connection approach for the pipe size and utility standard, with components oriented for operation and future access.
The first buried run should establish the visual standard for the rest of the work. Check trench alignment, cover depth, separation strategy at crossings, and any early restraint conditions before production continues.
The first change in direction, tee, valve, or dead end should show the selected restraint system installed correctly, whether that is a restrained joint, tie-rod assembly, clamp arrangement, or thrust block.
For valves and specialties, the first installation should confirm the basics that often get missed later: stem-up or head-up orientation where required, proper box or post, supported access, and enough working clearance for operation, testing, and maintenance.
Follow-Up Phase
This phase keeps the work within the accepted standard while production is underway. Inspect joints continuously so that each material system is installed with its approved joining method and without visible defects, incomplete engagement, damaged gaskets, or poor sealing surfaces.
Keep a close watch on burial criteria and do not let trench backfill outrun inspection. Where the retained project criteria include specific minimum cover, those values need to be verified before concealment rather than reconstructed afterward from memory.
This is also where many coordination failures show up. Restrained joints, thrust blocks, anchors, and tie rods need to be in place at each change in direction and branch point before pressurization.
Dielectric transitions and corrosion-protection measures have to be complete before underground ferrous components disappear from view.
Valves, backflow preventers, detector checks, pressure-reducing valves, air valves, and meter assemblies need correct orientation and support, especially where vault installations or piers are part of the design.
Throughout the run, crews also need to keep pipe interiors clean, maintain end protection, support aboveground piping correctly, and preserve accessibility for the devices that will later be tested, adjusted, or maintained.
Completion — Final Acceptance & Closeout
Final acceptance in this section depends on evidence, not assumption. Hydrostatic testing should occur before joints are covered and after thrust blocks or other restraint systems are ready for the load.
The specification template ties acceptance to a defined sequence: the line is filled in advance, pressure is raised in increments, joints are observed during the test sequence, and leakage must remain within the allowable limit.
Any leaking joints are remade with new materials and retested until the line meets the requirement.
Cleaning and disinfection are equally important. After flushing, potable-water systems move through the prescribed disinfection path required by the authority having jurisdiction or by the retained AWWA procedure, followed by final flushing and sterile sampling.
Service should not be turned over until the biological results are acceptable.
The physical closeout also includes continuous warning tape over buried piping, plastic-piping identification where the specification requires it, complete O&M information for valves and specialties, and field records that clearly document what was tested, accepted, and turned over.

References and Other Specification Systems
References
- ASTM B88 — Standard Specification for Seamless Copper Water Tube
- ASME B16.18 — Cast Copper Alloy Solder Joint Pressure Fittings
- ASME B16.22 — Wrought Copper and Copper Alloy Solder Joint Pressure Fittings
- ASME B16.24 — Cast Copper Alloy Pipe Flanges, Flanged Fittings, and Valves
- AWWA Standards List — C151, C110, C153, C111, C600, C105, C906, C900, C907, C950, C651 and related water-distribution standards
- AWWA M44 — Distribution Valves: Selection, Installation, Field Testing, and Maintenance
- AWWA M41 — Ductile-Iron Pipe and Fittings
- AWWA M23 — PVC Pipe: Design and Installation
- ASTM D2774 — Standard Practice for Underground Installation of Thermoplastic Pressure Piping
- ASTM F645 — Standard Guide for Selection, Design, and Installation of Thermoplastic Water-Pressure Piping Systems
- ASTM Plastic Pipe Standards — includes D2774, F645 and related plastic pressure piping standards
- MSS SP-60 — Connecting Flange Joints Between Tapping Sleeves and Tapping Valves
- NFPA 24 — Standard for the Installation of Private Fire Service Mains and Their Appurtenances
- NSF/ANSI/CAN 61 — Drinking Water System Components: Health Effects
- NSF/ANSI 14, NSF/ANSI/CAN 61 and NSF/ANSI/CAN 372 — Safe Drinking Water Act compliance reference
- NSF/ANSI/CAN 372 — Drinking Water System Components: Lead Content
Other Specification Systems
- UFGS 33 11 00 — Water Utility Distribution Piping
- UFGS — Unified Facilities Guide Specifications Public Library
- VA Master Specifications — Technical Information Library
- NMS — Canadian National Master Construction Specification
- RIB SpecLink — Specification Documents and Construction Catalogs
FTQ360 Inspection & QAQC Platform
FTQ360 helps field teams manage this section as a documented QAQC process instead of a sequence of disconnected inspections.
The checklist can be used to organize receiving checks, pre-cover reviews, restraint and valve inspections, hydrostatic-test records, flushing and disinfection evidence, and turnover documentation in one project record.
For work like facility water distribution piping, that matters because acceptance depends on proving the sequence of control points as much as proving the final installation.
How to Use the Free Template (quick start)
Use the Section 22.11.13 checklist template as your starting point, then tailor the checkpoints to the retained pipe materials, utility connection approach, burial criteria, valve and specialty scope, and testing requirements on your project.
The strongest setup is the one that matches your actual hold points in the field, especially before concealment, before pressurization, and before service activation.
If your team still uses a printed copy in limited situations, make sure the final record is still brought back into the project file so the acceptance history stays complete.
MasterSpec® and MasterFormat® are referenced here only for section identification and clarity. This blog does not reproduce proprietary specification content.