
The final QA and production inspection is the last step in the construction process, and it's crucial for leaving a lasting impression on buyers. A successful inspection ensures that you are viewed as a great builder, and it also helps to avoid turning buyers into quality assurance inspectors themselves.
This is a Pandora's box you don't want to open, as it could result in endless lists of issues. First-time quality is essential as it can impress buyers and improve the construction process. Therefore, inspect from a buyer's perspective to identify any hidden deficiencies and ensure a clean slate for a successful production inspection.
Why QA Inspections Matter in Residential Projects
The entire QA inspection process is about building trust with your buyers. If done right, you'll end up developing a good relationship with your buyer during the warranty period and in turn, they will recommend you to anyone they know looking for an awesome new home.
Inspecting from a buyer's perspective helps you identify any hidden deficiencies that a buyer may see from one or more characteristics from the specified requirements from the inspector.

However, we all know how challenging it can be to stay on top of everything during the manufacturing process and when it's crunch time for the final inspection report. So, here are six tips for a better residential production inspection and final QA inspection.
1. Create a Detailed Final QA Checklist
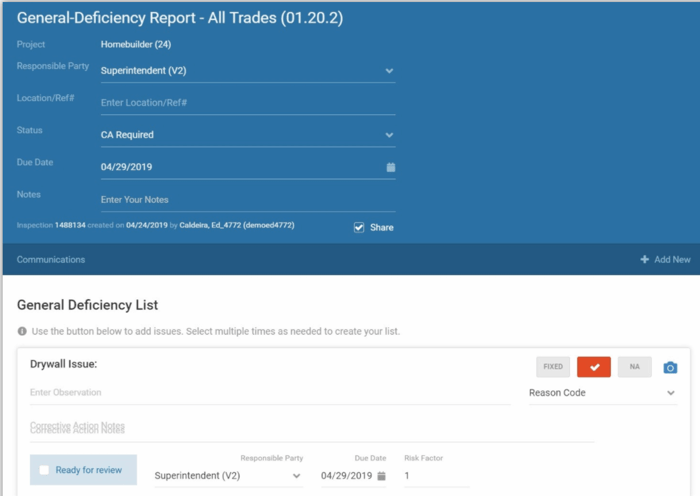
An essential tool to have at hand while conducting inspections is an inspection form. This quality form creates consistency during the inspection, captures all the punch items for review, and helps you identify deficiencies that need fixing.
Over the years, statistical process control technology has helped improve the quality of this process by automating quality assurance checklists. Now, quality inspection assurance managers can download ready forms from a mobile application and streamline their inspection activities.
Additionally, the best inspection apps allow you to onboard the construction team and assign checklist components to them. This way, you don’t have to rely on manual checklists that may contain errors or inaccurate information.
A good Quality Assurance form/checklist will include the following:
- Organize the QA checklist into sections, one section for each room, foundation, exterior and landscaping
- Review past punch lists from your buyers and add checkpoints for recurring issues
- Add lessons learned checkpoints from experienced personnel in the construction team
- Assign each checkpoint a division of work – for example, plumbing, electrical, lighting, etc. This enables analysis by specialty later on
- Attach reference materials to help the QA inspector assess the potential issues accurately – diagrams, photos, training materials, etc. so that good and bad are well understood by everyone
- Include extended checklist features such as dynamic checkpoints including pre-set checkpoints for custom home items
- A sign-off by the inspector that the inspection is complete
 2. Train to The Final QA Checklist
Once you develop the Quality assurance (QA) forms and quality control inspections, train all parties involved in the inspection to set your expectations early on. This training will help ensure that quality control services are properly implemented, reduce errors, and improve the quality of information you get from the inspection procedure.
When you have completed the detailed inspection form that you can use to start the training process. The checklist itself is the training agenda. The training should review each checkpoint including:
- Your expectations for passing the checkpoint
- The difference between pass and fail, which may include several failure modes
- The impact of what happens when a deficiency gets through
Training for quality control inspectors can be done during regular operations meetings. Spending a few minutes to review some checkpoints can improve the accuracy of pre-shipment inspections and reduce errors. It's important to make sure that all checkpoints are worth the time it takes to train on them. If a checkpoint isn't critical to ensuring the quality of the product, then it may be best to remove it from the pre-shipment inspection checklist.
3. Start your Final QA Inspections
The best practice is to incorporate a quality control process by providing the superintendent with sufficient time to pre-inspect the project before declaring it ready for the final QA inspection. This additional step enables them to identify any potential issues and address any incomplete work, ensuring that the final assessment is comprehensive and accurate.
The official Final QA Inspection is best done by an independent person. This could be a manager, the warranty department, or the QA department. The important part is that another set of eyes that can take a fresh look at the home.
While inspecting for product quality, document new issues as OPEN and awaiting correction and only pass the final QA inspection when the open deficiencies are corrected. If OPEN matters must be dealt with at a later date, include this in the inspection report. Finally, document the corrected issues as FIXED and attach photos of the fixed area.
Afterwards, when engaging in mass production, give the home builder sufficient time to rectify any issues identified before handing the property over to the customer. It is crucial to ensure that all OPEN issues have been resolved to prevent the home buyer from encountering any problems during their pre-closing inspection.
4. Organize Your Communication Channels
Communication during an inspection procedure can dramatically reduce inconsistencies and speed up the process. One way to streamline your communication is by linking your inspection checklists, dependencies, and deficiencies to a central platform.
Centralizing all inspection components helps you assign duties and quickly send out notifications and emails to the relevant person. Additionally, organizing your communication into a central repository helps improve accountability, tracing progress on issues, and tracking performance throughout the quality inspection process.
5. Involve Quality Control from the Start of Your Construction Project
Involving your Quality Assurance team from the beginning of the construction project simplifies the final QA inspection because each stage was checked and verified. Additionally, quality control will identify deficiencies and areas of non-compliance so you can correct them before they're baked into the project and become costly to rectify. That way, the final inspection process will have fewer issues to fix.
6. Conduct a Final Walkthrough After Inspection
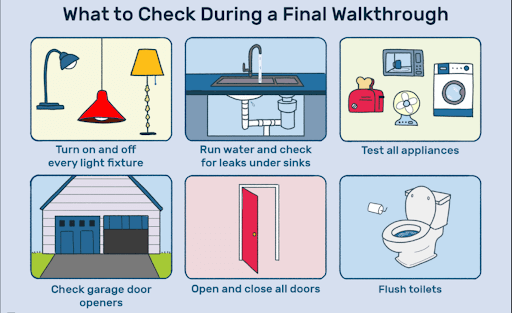
(Image source: thebalance.com)
7. Lessons Learned. Prevent Recurrences – Learning from Mistakes
The final tip is to create a detailed shortlist with mistakes to learn from. This list should compile lessons learned, deficiencies, the final inspection checklist results, supply chain shortages, and corrective actions.
For deficiencies, use the app’s dashboard analytics to display the most frequent and high-priority items. The best practice is to upload the shortlist into a secure backup system that ensures the safety and is easily accessible from any location. The FTQ360 app has a file backup service to compile your reports and upload them to a cloud-based repository.
Next, take action to prevent the highest priority and costly issues from recurring through continuous, regular improvement. One way to do this is by training the construction team and making lessons learned a regular monthly process.
Additionally, train the team on the Pareto principle: 80% of final QA punch items are caused by 20% of recurring problems. For example, preventing one recurring issue per month can eliminate your top 10-12 issues in a year, which can translate to a 50% reduction in punch items in one year.
Invest in Construction QA Software
Manual processes and spreadsheets simply can’t keep up with the fast pace and complexity of today’s residential construction projects. To consistently execute high-quality QA inspections and reduce costly errors, purpose-built construction QA software is essential.
Platforms like FTQ360 enable your teams to:
-
Standardize inspection checklists across subdivisions and crews
-
Capture real-time data and photos directly from the field
-
Automatically track open issues and corrective actions to closure
-
Generate detailed QA reports for internal teams and clients
-
Analyze trends across builds to pinpoint recurring defect types
By centralizing your quality assurance process, you reduce rework, improve trade accountability, and accelerate final sign-offs all while gaining visibility across every project stage.
Pro Tip: Choose QA software that supports mobile use, integrates with your existing construction management tools, and allows customizable workflows for each phase of your build cycle.
Make QA Inspections a Competitive Advantage
Residential construction is competitive, and quality is no longer a nice-to-have it’s a differentiator. A strong QA inspection process not only ensures compliance and reduces defects but also builds lasting trust with homeowners and developers.
By standardizing your inspections, leveraging real-time data, and continuously improving based on performance trends, you can deliver better homes faster and with fewer callbacks.
Investing in the right tools, like QA inspection software tailored to homebuilders, empowers your QA managers to lead with confidence and consistency across every job site.
Bottom line: Builders who treat QA as a strategic asset not just a checklist deliver superior results and protect their margins.
